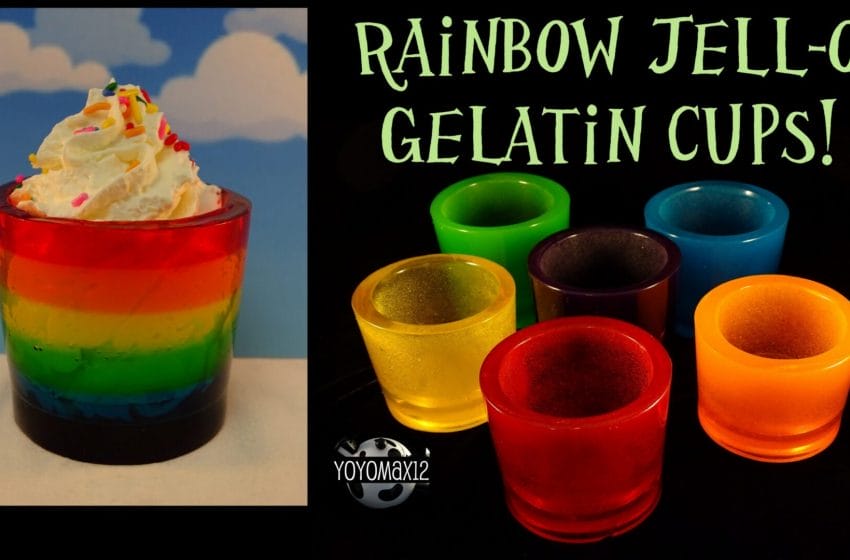
These cups look so fun and are great to make if you are looking for something different for that party to use to have mousse inside or a wonderful dessert I really love this idea it is such fan and the video tutorial to watch to see how to make these cups is interesting to watch
This great recipe is brought to you by Tammy from yoyomax12 – the diet free zone on YouTube, thanks for sharing this recipe with us
Here below is the recipe and the video tutorial to watch to make these cups
One recipe:
1 package 3oz (85g) package jello
4 packets unflavoured gelatin powder (28 g, 1oz total)
150 ml (5oz) (10 tbsp) water
Two cups of different sizes. The inside cup needs to be flexible.
This is enough to make one cup of the size that I made in the video (a mold made with one 10oz and one 6.5oz cup) and 4-5 small gummy candies.
If you want to make larger cups then you may have to double or triple the recipe.
If you want to make rainbow stripe cups, make one of the recipes for each colour of the rainbow. This will be enough to make 6 of the cups shown in the video.
Method for one cup of one colour:
Combine the jello powder, water and gelatin packets in a medium saucepan. Heat over medium heat, stirring often. Heat and stir until the gelatin is dissolved and the mixture starts to steam (almost to a boil).
Pour the mixture into a measuring cup and allow to rest for 5 minutes or so, this will allow bubbles to rise. Scrape off the foam and discard.
Pour liquid into larger cup.
I used 150ml (5oz)(10 tbsp) of gelatin mixture liquid in the cups in the video.
Fill flexible smaller cup with cold water to 2/3. Push cup into the gelatin mixture in the larger cup. Stop when the cup is level with the outside up rim. Place something heavy (I used butter knives) to hold the cup in place and centered.
Allow to set. This should take about 30 minutes to an hour at room temperature.
Gently pull inside cup away from the gelatin, remove cup.
Gently pry gelatin away from the inside of the larger cup. Remove from larger cup.
Store in the fridge in a covered container, but this is very stable at room temperature.
Method for rainbow stripe cup:
Basically the same method as for the one cup except you will be adding one layer at a time, allowing each layer to set before adding the next. Allowing them to set in the fridge makes them set faster.
If any of your mixture hardens before you can use it, just re-heat in the microwave until liquid.
For the very first layer, you won’t need the cup if the layer is small enough not to reach the bottom of the inside cup.
Once you get 3 or so layers in and solidified, you can remove the butter knife weights.
Mold Instructions:
You basically need to make a mold with one cup inside of the other. The cup inside needs to be small enough so that it allows liquid to go all the way around it (to at least 1/8 inch thickness) and allow for liquid underneath it (at least 1/8 inch thickness).
Cut the cup down so that when it is floating in the liquid the brim is level with the outside cup’s brim and the bottom is not touching the bottom of the outside cup.
Add enough liquid to the cup so that it goes up to the brim with the inside up in it.
I suggest you use plain water to test out your mold. Fill the larger cup to about half. Press the smaller cup into the liquid and check to see if it is enough. Add more if it isn’t to the brim, if it is too much the water will spill over. Remove the smaller cup. Measure the water left in the larger cup. This is the amount of gelatin liquid you will need for one cup.


