Have you ever bought icing/frosting in a store and it just doesn’t do the cookies that you make so diligently justice? Well, this recipe will fix that for you. It’s simple to make and it will make your cookies the icing that it deserves. This recipe will yield about 4 1/2 cups, enough to topcoat 4 to 5 dozen (3-inch) cookies.
I remember buying these gorgeous looking cookies in my local bakery. I was excited because they looked amazing. Short story, when I ate them, the cookie was delicious but the icing that they put on it was disappointing, it does not complement each other and it was thin.
On this recipe, I also write on how to make the icing for specific purposes, such as outlining, top coating, marbling, etc. You’ll have a professional-looking and the right kind of icing for every cookie that you make.
Ingredients for Royal Icing
2 pounds powdered sugar
1/2 teaspoon cream of tartar
5 large egg whites / about 11 tablespoons / 5 1/2 ounces pasteurized whites)
flavoring (to taste)
liquid-gel food coloring of your choice (to desired shade)
How to Make Royal Icing
In the bowl of an electric mixer, mix the sugar and cream of tartar. To moisten the sugar, stir in the egg whites by hand. Fit a whip attachment on the electric mixer and to evenly distribute the egg whites, beat on low speed. Next, turn to medium-high speed and continue to beat just until the icing is silky and very white, about 1 – 2 minutes(as you beat it, the icing will lighten and thicken).
Be careful not to beat the icing any longer than is needed and to only beat at high speed only at very thick consistency. Extended beating can pump a lot of air into it, especially of looser icing, creating bubbles that can difficult to remove once incorporated. A dd in coloring and/or flavoring, as desired.
Consistency Adjustments: These consistency adjustments are guidelines for 1 cup of thick, un-tinted Royal Icing. The addition of any variation such as food coloring, flavoring, beating time, and egg size can all affect the end-consistency of your icing.
For outlining: Put 1/2 to 3/4 teaspoon of water. Start with 1/2 teaspoon water for crisp, well-defined outlines. Gradually add more water if the icing is too thick to pipe through a small (1/8-inch) hole in a parchment pastry cone. When you draw thin lines, there should be no to minimal spreading when piped.
For top coating: Start by adding 1 1/2 teaspoons water to avoid icing run-off on cookies under 2 inches. To improve spread-ability on larger cookies, gradually increase to 2 to 2 1/2 teaspoons, as needed.
For marbling: A consistency thicker than top coating. Example put 3/4 to 1 1/2 teaspoons water per cup of thick icing, but make sure that icing can be swirl. Add more colors to the icing for that beautiful marble effect.
For stenciling: 1/2 to 1 teaspoon water generally works best. When the spatula is lifted, the icing must be thin enough to easily spread into the stencil openings without leaving peaks or tracks.
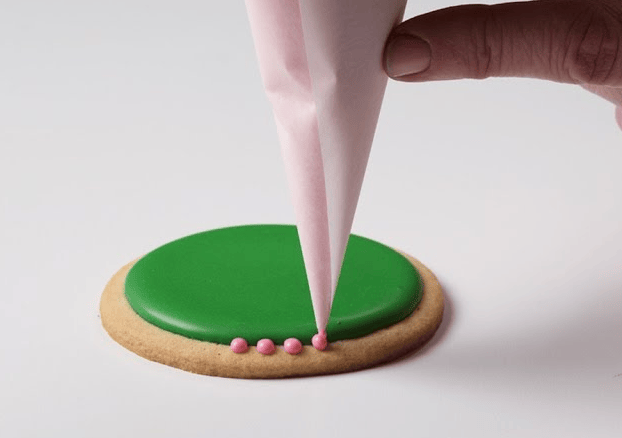
For beadwork: Put 2 to 3 teaspoons water. Cut the parchment paper cone opening with 1/8 inch or less. You should form a rounded dot when piped.
To see the original recipe that inspired this one, check out the recipe for Royal Icing found at Julia M Usher.


